The story behind a simple, yet complicated Smart Door!
Here's an interesting tale behind the development of an RFID-based Smart Access Door (frankly speaking, an over-engineered one), that we've put together recently at Inovus Labs.

I've been a fellow of Inovus Labs for more than a half-dozen years. Since the very beginning, I was really fond of tinkering with the IoT components and electronics circuitry available at the mini IoT lab up there. The journey become much more interesting when more hands started pouring in. Building a smart access door for Inovus Labs has been on our collective bucket list for quite some time.
This project is a joint venture with my Inovus fellow Mr. Nikhil T Das. We express our heartfelt gratitude to the entire Inovus Execom (especially Badhusha Shaji & Abhishek V Gopal) for all the support.
Conceptualizing the Smart Door
Before diving into the core technicalities, the team brainstormed to outline the system's functionalities and components. We envisioned a door access system that would enable authorized personnel to enter via RFID cards while ensuring smooth and automated closure, even when the door is barely shut. Integrating Firebase and Discord added crucial security and monitoring features to keep track of all access events.
Components Used
The following list of components was used for building the so-proposed RFID-based smart door system. All hardware components required for this project build are available online and associated purchase links are attached below.
Hardware Requirements
- ESP32 Development Board
The ESP32 was chosen for its versatility, built-in WiFi capabilities, and adequate GPIO pins for interfacing with other components. - RFID Reader
A reliable RFID reader module was selected to interact with RFID cards and grant access to authorized personnel. - Magnetic Switch
The magnetic switch served as the trigger for the auto-close mechanism. The system would initiate the auto-close process when the door was left ajar. - LED Indicators
LEDs were integrated to indicate WiFi connection status and access approval. - Buzzer
To provide audible feedback during various events, such as successful access or an invalid RFID tag. - 12v Solenoid Lock
A secure lock actuated by an electric current, grants access to authorized personnel. - Single Relay Module
To control the 12v Solenoid Lock with the ESP32, the lock requires a higher current than the microcontroller can handle directly. - JHD204A LCD Display
An LCD screen displays status information and messages for users (optional).
Software Requirements
- Firebase Realtime Database
Firebase was adopted to store logs of all access events, ensuring easy retrieval and monitoring of activities. - Discord Webhooks
Webhooks were employed to send real-time alert messages to a dedicated Discord channel in the event of unauthorized access attempts or system malfunctions.
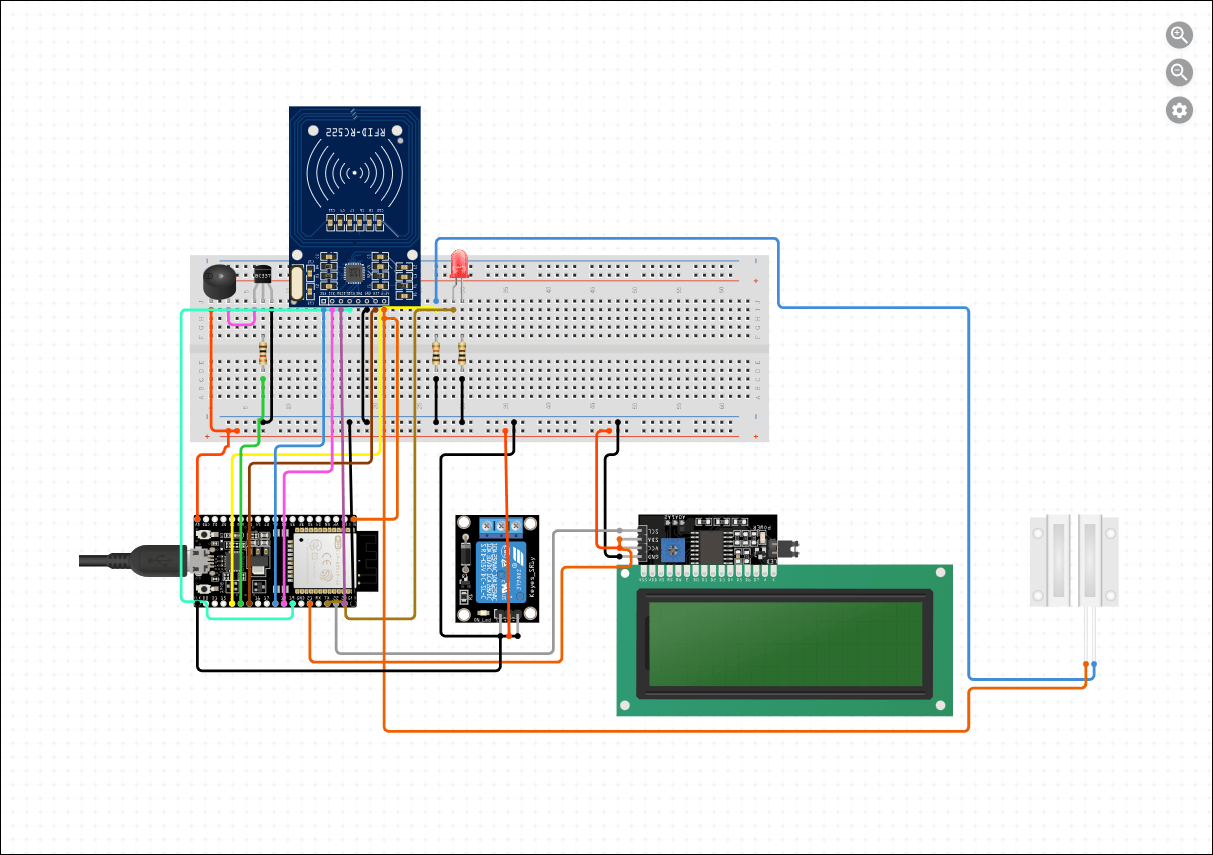
Circuit Diagram
Code Explanation
The system only uses 6 libraries to handle all its complex tasks. The WiFi.h library enables us to establish a network connection over the available WiFi network.
void connect_WiFi() {
  WiFi.mode(WIFI_STA);
  WiFi.begin(ssid, password);
  Serial.print("Connecting to WiFi ...");
  while (WiFi.status() != WL_CONNECTED) {
    Serial.print('.');
    delay(1000);
  }
  Serial.println(WiFi.localIP());
}
The MFRC522.h library is used to read the RFID Cards / Tags. The SPI.h library allows you to communicate with SPI (Serial Peripheral Interface) devices, with the ESP32 Board as the controller device.
void connect_MFRC() {
  SPI.begin();
  mfrc522.PCD_Init();
  Serial.println("\nReady to read RFID tags...");
}
And here's the most overkill part of the project build. The project sends out an alert for every legit activity happening around this, such as Authorized & Unauthorized Door Access and Autoclose trigger. The HTTPClient.h library helps us to easily make HTTP - GET, POST, and PUT requests to a web server.
void sendDiscordWebhook() {
  HTTPClient http;
  http.begin(webhook_url);
  http.addHeader("Content-Type", "application/json");

  if(autoLock == true ) {

    // define the json to notify the trigger of an autoclose

  } else {

    if(owner != "") {

      // json to notify the trigger for a successful door opening

    } else {

      // // json to notify the trigger for an unsuccessful door opening

    }
  }
  Serial.println(json);

  int http_code = http.POST(json);
  if (http_code == 204) {
    Serial.println("Discord Webhook Sent...");
  } else {
    Serial.println("Error sending webhook...");
  }
}
The status of the WiFi connection is checked every 30 seconds and in case of any issues, it'll disconnect and attempt to reconnect on its own.
unsigned long previousMillis = 0;
unsigned long interval = 30000;

unsigned long currentMillis = millis();
  if ((WiFi.status() != WL_CONNECTED) && (currentMillis - previousMillis >=interval)) {
    Serial.println("Reconnecting to WiFi...");
    WiFi.disconnect();
    WiFi.reconnect();
    previousMillis = currentMillis;
  }
Every door activity is logged onto a Firebase Real-time Database. The time.h library helps us to handle date & time-related activities, just like Date() in JavaScript. The Firebase_ESP_Client library supports RTDB, Cloud Firestore, Google Cloud Storage, Cloud Messaging, and other Cloud Functions for Firebase.
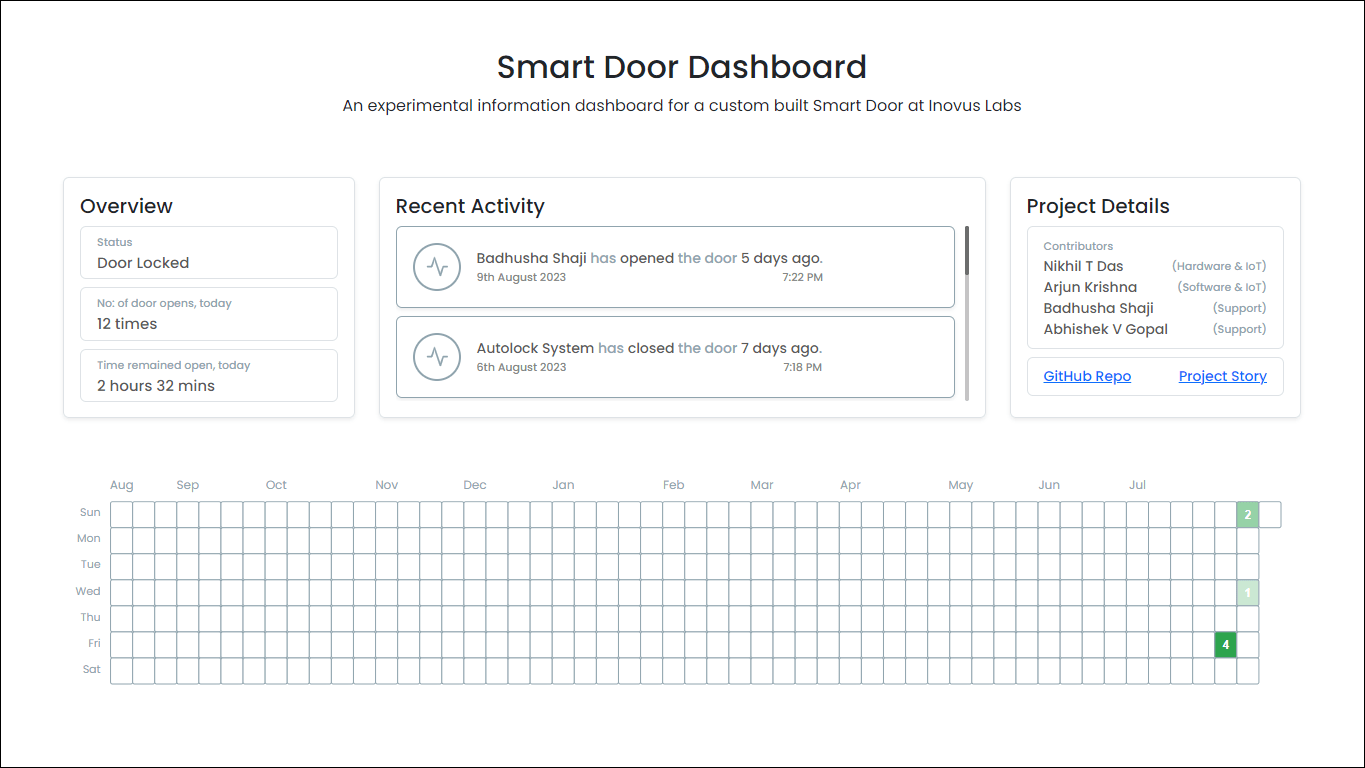
Results
A simple dashboard was built using vanilla JavaScript to showcase the current status of the door and the so collected activity history.
Hereby adding the live dashboard demo link.
(Sorry that we couldn't care for its device responsiveness).
https://door.dashboard.inovuslabs.org/